Showing posts with label Active Directory Group. Show all posts

April 17, 2012

Manage users in SharePoint 2010 using active directory

To manage users in SharePoint 2010 using active directory, please follow these steps: 1.Log into your server through Remote Desktop Connection (instructions for connecting to your server through RDC can be found here).
2.Navigate to Start > Administrative Tools > Active Directory Users and Computers.
3.Expand the active directory domain and right-click Users and choose New > User.
4.Enter in the user's name, username (login name) and click Next.
5.After clicking Next you will be prompted to enter in a password for the user. Enter in a secure password, click Next, and then click Finish.
6.The AD user is now setup.
7.To add the user to SharePoint, log into the SharePoint site as the account administrative user.
8.Navigate to Security and click the Security link.

April 12, 2012

How to Backup and Restore Active Directory on Server 2008


Before you can backup Server 2008 you need to install the backup features from the Server Manager.
1. To install the backup features click Start → Server Manager.

How to Backup and Restore Active Directory on Server 2008 - 1
2. Next click Features → Add Features


How to Backup and Restore Active Directory on Server 2008 - 2

3. Scroll to the bottom and select both the Windows Server Backup and the Command Line Tools
How to Backup and Restore Active Directory on Server 2008 - 3

4. Click Next, then click Install

Backing up Server 2008 Active Directory

Now that we have the backup features installed we need to backup Active Directory. You could do a complete server backup, but what if you need to do an authoritative restore of Active Directory?
As you’ll notice in Server 2008, there isn’t an option to backup the System State data through the normal backup utility.


How to Backup and Restore Active Directory on Server 2008 - 4
So what do we do? We need to go “command line” to backup Active Directory.
1. Open up your command prompt by clicking Start and type “cmd” and hit enter.
2. In your command prompt type “wbadmin start systemstatebackup -backuptarget:e:” and press enter.
Note: You can use a different backup target of your choosing
3. Type “y” and press enter to start the backup process.


How to Backup and Restore Active Directory on Server 2008 - 5
When the backup is finished running you should get a message that the backup completed successfully. If it did not complete properly you will need to troubleshoot.


How to Backup and Restore Active Directory on Server 2008 - 6
Now you have a system state backup of your 2008 Server!

Authoritative Restore of Active Directory

So now what if you accidentally delete an OU, group, or a user account and it’s already replicated to your other servers? We will need to perform an authoritative restore of the Active Directory object you accidentally deleted.
1. To do this you will need to boot into DSRM (Directory Services Restore Mode) by restarting your server and pressing F8 during the restart.
2.Choose Directory Services Restore Mode from the Advanced Boot menu.


How to Backup and Restore Active Directory on Server 2008 - 7
3. Login to your server with your DSRM password you created during Active Directory installation.
4. Once you’re logged into your server and in DSRM safe mode, open a command prompt by clicking Start, type “cmd“, and press enter.
5. To make sure you restore the correct backup it’s a good idea to use the “wbadmin get versions” command and write down the version you need to use.


How to Backup and Restore Active Directory on Server 2008 - 8
6. Now we need to perform a non-authoritative restore of Active Directory by typing “wbadmin start systemstaterecovery -version:04/14/2009-02:39“.
Note: The version of backup will vary depending on your situation. Type “y” and press enter to start the non authoritative restore.
7. Go grab some coffee and take a break while the restore completes.


How to Backup and Restore Active Directory on Server 2008 - 9
8. You can mark the sysvol as authoritative by adding the –authsysvol switch to the end of the wbadmin command.


How to Backup and Restore Active Directory on Server 2008 - 10

9. But if you want to restore a specific Active Directory object then you can use the ever familiarntdsutil.
For this example we are going to restore a user account with a distinguished name of CN=Test User,CN=Users,DC=home,DC=local. So the commands would be:
ntdsutil
activate instance ntds
authoritative restore
restore object “cn=Test User,cn=Users,dc=home,dc=local”
Note: The quotes are required


How to Backup and Restore Active Directory on Server 2008 - 11
10. Reboot your server into normal mode and you’re finished. The object will be marked as authoritative and replicate to the rest of your domain.

Using Active Directory Snapshots

There is a really cool new feature in Windows Server 2008 called Active Directory Snapshots. Volume Shadow Copy Service now allows us to take a snapshot of Active Directory as a type of backup. They are very quick to create and serve as another line of defense for your backup strategy.
With your server booted into normal mode open a command prompt by clicking Start, type “cmd“, and press enter.
We are going to use the ntdsutil again for creating the Active Directory snapshots. The commands are:
ntdsutil
snapshot
activate instance ntds
create
quit
quit


How to Backup and Restore Active Directory on Server 2008 - 12
So now that you have a snapshot of AD, how do you access the data? First we need to mount the snapshot using ntdsutil. The commands are:
ntdsutl
snapshot
list all
mount 1 — (Note: You should mount the correct snapshot you need; for this example there is only 1.)

quit
quit


How to Backup and Restore Active Directory on Server 2008 - 13
Your snapshot is mounted, but how do you access the data? We need to use the dsamain command to accomplish this. Then we need to select an LDAP port to use. The command is as follows:

dsamain –dbpath c:\$SNAP_200905141444_VOLUMEC$\WINDOWS\NTDS\ntds.dit –ldapport 10001
The result should look like this:


How to Backup and Restore Active Directory on Server 2008 - 14
Now we need to go to Start, Administrative Tools, then Active Directory Users andComputers.
Right click Active Directory Users and Computers and select Change Domain Controller.


How to Backup and Restore Active Directory on Server 2008 - 15
In the area that says < Type a Directory Server name [:port] here running the dsamain command.> enter the name of your server and the LDAP port you used when
For my example it would be: WIN-V22UWGW0LU8.HOME.LOCAL:10001


How to Backup and Restore Active Directory on Server 2008 - 16
Now you can browse the snapshot of Active Directory without affecting anything else negatively.

March 05, 2012

Active Directory Groups vs. SharePoint Groups for User Management.

Advantages and disadvantages of the group types and let you choose what kind fits better for your needs.


Create and Configure Accounts and Permissions in Active Directory Server

You need to apply all of these settings or your User Profile Service won’t work. To be able to complete this section, you will need full access to the Active Directory to perform AD-Forest based permission settings using the adsiedit tool


Step 1. Create Service Accounts in Active Directory.


We will need two accounts, one for the UPS application pool (we will call this sps_ups_pool) and one for the synchronization between SharePoint and Active Directory (we will call this sps_ups_sync).
These accounts should only have domain user rights (don’t listen to people stating you need local admin or worse – domain admin rights for these accounts). Also, these accounts need to have two flags enabled in AD: User cannot change password and Password never expires.
Some SharePoint resources state that you should not check these options since Managed Accounts in SharePoint handle password changes etc. However this is incorrect, the User Profile Service does not work fully with the Managed Accounts and I have found that using them would causes headaches each time your Active Directory policies demand the service account to change the password.


<><><><><><> <><><><><><><><> <> <> <><><><><><> <><> <><> <><><><> <> <> <><><><><><> <><> <><> <><><><> <><>
Account properties window with two important flags enabled.
Step 2 : Check The Farm Administrator Account Permissions


To successfully provision the User Profile Service, the farm admin account needs to be local administrator on all the SharePoint 2010 servers. You should check what account is your farm admin and give that user local admin rights –
remember to remove these permissions after you finish this tutorial and verify that UPS is provisioned.
To identify your Farm Admin account, go to Central AdministrationSecurityConfigure Service accounts option and select Farm Account from the menu.


<><><><><><> <><><><><><><><> <> <> <><><><><><> <><> <><> <><><><> <> <> <><><><><><> <><> <><> <><><><> <><>
Farm Account credentials configuration in Central Administration
As you can see, my farm admin account is ad\spssetup – so I will have to verify that this user belongs to the local administrators group on every SharePoint server in my farm before going forward with the tutorial.


Step 3 : Setup Active Directory Rights For The sps_ups_sync Account.


Now the most important part of the setup, and one which often causes issues when improperly configured.

Assign Replicating Directory Changes permission to sps_ups_sync account

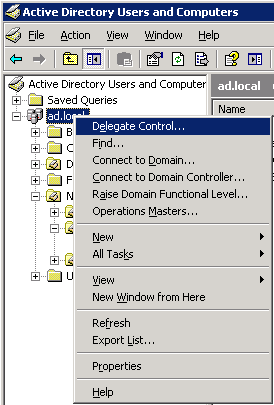
Login to your AD Server and open up Active Directory Users and Computers console. Now right-click the Active Directory Server name and choose the Delegate Control option.


<><><><><><> <><><><><><><><> <> <> <><><><><><> <><> <><> <><><><> <> <> <><><><><><> <><> <><> <><><><> <><>
Active Directory Users and Computers console
On the informational screen click the Next button. Now you need to choose the account for delegation, click on the Add button and find the sps_ups_sync account.


<><><><><><> <><><><><><><><> <> <> <><><><><><> <><> <><> <><><><> <> <> <><><><><><> <><> <><> <><><><> <><>
Delegation Control window with sps_ups_sync account added
On the next setup screen, select the Create a custom task to delegate option and click next.


<><><><><><> <><><><><><><><> <> <> <><><><><><> <><> <><> <><><><> <> <> <><><><><><> <><> <><> <><><><> <><>
Custom task delegation selected


On the Active Directory Object Type window make sure that the This folder, existing objects in this folder, and creation of new objects in this folder option is selected and click Next.


<><><><><><> <><><><><><><><> <> <> <><><><><><> <><> <><> <><><><> <> <> <><><><><><> <><> <><> <><><><> <><>
Active Directory Object Type configuration
Next we should see the permissions setup window. You need to find the Replicating Directory Changes permission type. Do this with care since there are several other similar names. Also make sure that the General Checkbox is selected. The Property-Specific and Creation/Deletion of specific child objects should be unchecked.


<><><><><><> <><><><><><><><> <> <> <><><><><><> <><> <><> <><><><> <> <> <><><><><><> <><> <><> <><><><> <><>
Permissions window with the Replicate Directory Changes permission type selected
Now ensure that the proper permission is selected (verify with the screen above) and click Next. On the summary screen, just click Finish.


Now we need to add the same sps_ups_sync account to the AD Configuration container with the same permission set. To do this, press Windows + R buttons and type in: adsiedit.msc


If you do not have adsiedit (which is part of Windows Support tools),
go to http://technet.microsoft.com/en-us/library/cc773354%28WS.10%29.aspx and follow the instructions specific to your operating system.


In Adsiedit expand the Configuration tree node, right click on the CN=Configuration… container and select the Properties option.


<><><><><><> <><><><><><><><> <> <> <><><><><><> <><> <><> <><><><> <> <> <><><><><><> <><> <><> <><><><> <><>
Adsiedit window with CN=Configuration container properties just being selected
Next, go to the Security tab and click Add. If you have this button grayed-out, you probably need to change the ownership of this container. To do this, click the Advanced button, select the ownership tab and change the owner of this container to the administrators group or your current user. After changing the permission revert to the original owner if possible to prevent possible issues with system permissions to this container.
When you’ve clicked the Add button in the Security tab – you should add your synchronization account.


<><><><><><> <><><><><><><><> <> <> <><><><><><> <><> <><> <><><><> <> <> <><><><><><> <><> <><> <><><><> <><>
AdsiEdit Security Tab on Cn=Configuration main container
In the Permissions for Administrators section below the accounts list, find the Replicating Directory Changes and check the Allow option for our newly added sps_ups_sync account and click Apply.


<><><><><><> <><><><><><><><> <> <> <><><><><><> <><> <><> <><><><> <> <> <><><><><><> <><> <><> <><><><> <><>
Synchronization account permissions – Replicate Directory Changes checked.
You can close the Active Directory Users and Computers windows now and log off from the Active Directory Server. The permission configuration setup is completed.

March 02, 2012

How to get Users form Active directory

public static DataSet GetUsersForGroup(string GroupName) {
DataSet dsUser = new DataSet(); DirectoryEntry de = GetDirectoryObject();
//create instance fo the direcory searcher DirectorySearcher deSearch = new DirectorySearcher();
//set the search filter deSearch.SearchRoot =de;
//deSearch.PropertiesToLoad.Add("cn");
deSearch.Filter = "(&(objectClass=group)(cn=" + GroupName +"))";
//get the group result SearchResult results= deSearch.FindOne();
//Create a new table object within the dataset DataTable tbUser = dsUser.Tables.Add("Users"); tbUser.Columns.Add("UserName");
tbUser.Columns.Add("DisplayName");
tbUser.Columns.Add("EMailAddress");
//Create default row DataRow rwDefaultUser = tbUser.NewRow();
rwDefaultUser ["UserName"]= "0"; rwDefaultUser ["DisplayName"]="(Not Specified)"; rwDefaultUser ["EMailAddress"]="(Not Specified)";
tbUser.Rows.Add(rwDefaultUser);
//if the group is valid, then continue, otherwise return a blank dataset if(results !=null) { //create a link to the group object, so we can get the list of members
//within the group DirectoryEntry deGroup= new DirectoryEntry(results.Path,ADAdminUser,ADAdminPassword,AuthenticationTypes.Secure);
//assign a property collection System.DirectoryServices.PropertyCollection pcoll = deGroup.Properties; int n = pcoll["member"].Count;
//if there are members fo the group, then get the details and assign to the table for (int l = 0; l < n ; l++)
{
//create a link to the user object sot hat the FirstName, LastName and SUername can be gotten DirectoryEntry deUser= new DirectoryEntry(ADFullPath + "/" +pcoll["member"][l].ToString(),ADAdminUser,ADAdminPassword,AuthenticationTypes.Secure);
//set a new empty row DataRow rwUser = tbUser.NewRow();
//populate the column rwUser["UserName"]= GetProperty(deUser,"cn"); rwUser["DisplayName"]= GetProperty(deUser,"givenName") + " " + GetProperty(deUser,"sn"); rwUser["EMailAddress"]= GetProperty(deUser,"mail");
//append the row to the table of the dataset tbUser.Rows.Add(rwUser);
//close the directory entry object deUser.Close();
}
de.Close();
deGroup.Close();
}