SharePoint 2010 introduces the notion of
“Service Applications” which
build’s upon the “Shared Services Provider
(SSP)” which was introduced in SharePoint 2007. Service Applications are individual services that can be
configured independently and can be shared across other sites within your farm
with some service applications that can also be configured across
farms.
The individual service applications provided with SharePoint 2010 are listed as follows;
What is SharePoint User Profile Service?
The User Profile Service provides our SharePoint farm with all the social networking features that we have come to love in SharePoint 2007, plus more. It forms the basis of My Site support, User profile pages, Audiences and some of the newer features in SharePoint 2010 social computing such as social tagging.
More info:
User Profile service application overview (SharePoint Server 2010)
After you install both SharePoint Foundation 2010 update and SharePoint Server 2010 update, you should run the SharePoint 2010 Products Configuration Wizard to complete the upgrade. After a successful upgrade you should verify if your SharePoint server is indeed updated. To do this, go to the Central Administration – System Settings – Manage servers in this farm section. There you can see all your servers that are connected with the SharePoint farm (including smtp servers and SQL Servers).


The following screen provides you with the ability to set your Service Account. It would be best practice to select “Create new Managed account”, however with all the issues around beta and service accounts I would recommend using your Domain Administrator account.
A list of the service applications is also displayed below and I will keep the default services selected which is everything excluding the Lotus Notes Connector.

Click Next. I’ve seen the following “Processing” screen a few times now with the SharePoint 2010 install and is very re-assuring if I must say.

This now completes the Farm Configuration Wizard which is a breeze I must say. Below are all the services that are running by default.
 Click Finish
If we now navigate to Central Administration / System Settings / Manage servers in this farm, you will notice that our Services Running in the farm has expanded to include the Application Services.
Verify Managed Metadata Service installation
User Profile Services requires Managed Metadata Service to interact with. The SharePoint Managed Metadata Service (MMS) is a service that publishes a term store and normally some content types that the managed metadata will consume in its services. MMS is the key to the social tags and notes – since it is where where all tags are to be stored. You can create multiple MMS, but for the User Profile Service you will need at least one MMS.
First we will check if there is at least one MMS installed and configured.
Go to Central Administration – Application Management – Manage Service Applications and look for the Managed Metadata Service
If you used Configuration Wizard on your farm (which is what I would personally would recommend), you will probably have one MSS.
If you don’t have
one, from the ribbon select the icon
New and choose Managed
Metadata Service. Then you will have to setup some MMS
properties – which you also need to verify when you actually had one MMS before
(then you have to mark the Managed Metadata Service and click on the properties
icon in the ribbon).
You need to type in/verify
the service name (default Managed Metadata Service
is fine), check the service database name,
select application pool and Content type hub.
Even if you used the
Configuration Wizard, the Content Type Hub field will be empty and you will need
to select one
of your site collections for this role. For the needs of the User Profile Service this step isn’t necessary, so if you haven’t decided yet where your Content Type Hub should be – you can leave it blank. For this demo I will just type in my default root site collection which is http://sps/.
Lastly, navigate to Central Administration / System Settings / Manage services on server and start the Managed Metadata Web Service.
Create and Configure Accounts and Permissions
Configure the User Profile Service:
Now that we have successfully configured our Managed Metadata service we can now focus our attention on the User Profile Service. The User Profile Service provides our SharePoint farm with all the social networking features that we have come to love in SharePoint 2007, plus more. It forms the basis of My Site support, User profile pages, Audiences and some of the newer features in SharePoint 2010 social computing such as social tagging.
Before we begin, we need to ensure that our Farm account (DOMAIN\sp_farm) is listed as a member of the Local Administrator’s group where the User Profile Synchronization (UPS) service will be deployed. Please make a note to remove the DOMAIN\sp_farm account from the Local Administrator’s group after provisioning the User Profile Synchronization service. Please also note, that if you ever have to re-provision the UPS service at a later date, that you will need to ensure the DOMAIN\sp_farm account is added back to the Local Administrator’s group.
Let’s now navigate to Central Administration / Application Management / Manage Service Applications.
Click New and select “User Profile Service Application”

Now on the ribbon click the New icon and choose the User Profile Service Application.
The “Create New User Profile Service Application” window pops up in which you will enter the following details; (you will obviously enter in the details based on your environment setup)
The Create New User Profile Service window will appear. Enter some of the common and obvious fields such Name, database server, database names, etc. I will focus only on those fields where you need to change the default settings.
Name: User Profiles
Create new application pool: SharePoint – User Profiles.
Register a new managed account: e.g.
DOMAIN\sp_userprofiles (nb: this account will need to
be provisioned in Active Directory first).

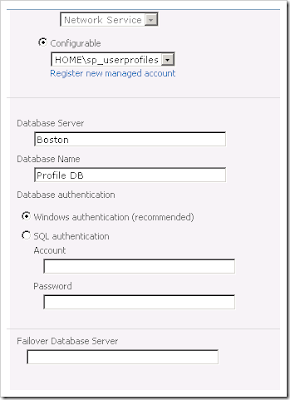
Enter your Profile Database server details and database authentication. You will notice that SharePoint 2010 introduces the ability to configure Failover Server which allows you to associate your SharePoint databases with another SQL server for failover purposes utilising SQL Server database mirroring. We will not specify a Failover Database server for any of our databases at this present time.
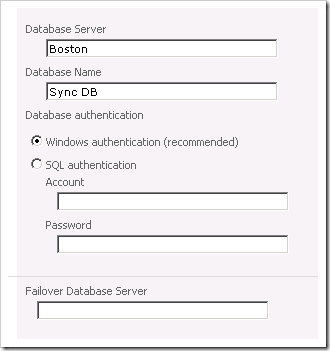
Specify your Synchronization Database which is used to store configuration and staging data for synchronization of profile data such as that from Active Directory.
Next, specify your Social Tagging Database which is used to store tags and notes that are created by users. Social Tagging is a new feature in SharePoint 2010 which is not only displayed against the items that user’s are tagging, but are also displayed in the user’s activity feed.

Next, select your Profile Synchronization Instance Server.
In the proceeding section, we will not create a My Site Host URL and will leave this for part two of this series.
Click Create.

You should now have the User Profiles service application listed and started.

We will now venture back into Central Administration / System Settings / Manage services on server.
Scroll down to the User Profile Service and User Profile Synchronisation Service and start both. The User Profile Service should start without any further user interaction, however the User Profile Synchronization Service will ask for your SharePoint Farm credentials.

Click Ok.
Both services should now be listed as started.

This in turn, will correctly configure and start our ForeFront Identity Manager Windows Services (FIM).

Now configure our User Profile Connection to our Active Directory Domain.
Navigate to Central Administration / Application Management / Manage Service Applications.
Click on User Profiles / Manage.

Click on Configure Synchronizations connections / Create New Connection.
Enter the follow details;
Connection Name:
Type: Active Directory
Auto discover domain controller or specify a domain controller
Authentication Provider Type: Windows Authentication
Account Name / Password:
Port: 389

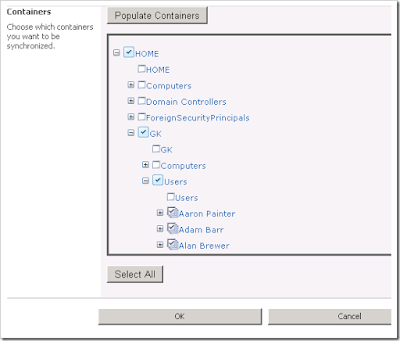
Click on Populate Containers
Click OK.
Your connection should now be listed as follows upon successful creation.

We can now easily setup connection filters against our Active Directory User Profile connection by clicking on the connection that was just created and selecting “Edit Connection Filters”.
Specify and Add any User or Group exclusions and then click OK.

Next we will Configure a Synchronization Timer Job via Central Administration / Application Management / Manage Service Applications / User Profiles.

Click Enable
We will finish off by initiating a full synchronization via Central Administration / Application Management / Manage Service Applications / User Profiles / Start Profile Synchronization.

In order to confirm that the import was a success, the Number of User Profiles should now be set to the number of users in your organization, in my case I have 269 dummy users in my Active Directory domain. Word of note; this will take some time and is considerably slower than an Active Directory User Profile import in SharePoint 2007

You can also venture into Manage User Profiles and search for users (please take note that SharePoint 2010 does not display any users by default and that you will have to search for them).

Edit a User Profile to ensure that all the necessary Active Directory attributes were successfully imported.

We have now successfully completed a User Profile Synchronization which will form as a basis for User’s My Sites in my next article. Until then, happy SharePointing!!
References
User Profile Service administration (SharePoint Server 2010)
http://technet.microsoft.com/en-us/library/ee721050.aspx
Configure profile synchronization (SharePoint Server 2010)
http://technet.microsoft.com/en-us/library/ee721049.aspx
The individual service applications provided with SharePoint 2010 are listed as follows;
What is SharePoint User Profile Service?
The User Profile Service provides our SharePoint farm with all the social networking features that we have come to love in SharePoint 2007, plus more. It forms the basis of My Site support, User profile pages, Audiences and some of the newer features in SharePoint 2010 social computing such as social tagging.
More info:
User Profile service application overview (SharePoint Server 2010)
Preparing your SharePoint
farm for the User Profile Service:
After you install both SharePoint Foundation 2010 update and SharePoint Server 2010 update, you should run the SharePoint 2010 Products Configuration Wizard to complete the upgrade. After a successful upgrade you should verify if your SharePoint server is indeed updated. To do this, go to the Central Administration – System Settings – Manage servers in this farm section. There you can see all your servers that are connected with the SharePoint farm (including smtp servers and SQL Servers).

As this is our first time in configuring the SharePoint
Farm, click on “Walk me through the settings
using this wizard” option and click Next.

The following screen provides you with the ability to set your Service Account. It would be best practice to select “Create new Managed account”, however with all the issues around beta and service accounts I would recommend using your Domain Administrator account.
A list of the service applications is also displayed below and I will keep the default services selected which is everything excluding the Lotus Notes Connector.

Click Next. I’ve seen the following “Processing” screen a few times now with the SharePoint 2010 install and is very re-assuring if I must say.

This now completes the Farm Configuration Wizard which is a breeze I must say. Below are all the services that are running by default.

If we now navigate to Central Administration / System Settings / Manage servers in this farm, you will notice that our Services Running in the farm has expanded to include the Application Services.
 |
| Manage Servers in the Farm Window |
Verify Managed Metadata Service installation
User Profile Services requires Managed Metadata Service to interact with. The SharePoint Managed Metadata Service (MMS) is a service that publishes a term store and normally some content types that the managed metadata will consume in its services. MMS is the key to the social tags and notes – since it is where where all tags are to be stored. You can create multiple MMS, but for the User Profile Service you will need at least one MMS.
First we will check if there is at least one MMS installed and configured.
Go to Central Administration – Application Management – Manage Service Applications and look for the Managed Metadata Service
If you used Configuration Wizard on your farm (which is what I would personally would recommend), you will probably have one MSS.
 |
| Managed Metadata Service in the Service Applications window |
 |
| Managed Metadata Service properties window |
 |
| Managed Metadata Service Properties window |
of your site collections for this role. For the needs of the User Profile Service this step isn’t necessary, so if you haven’t decided yet where your Content Type Hub should be – you can leave it blank. For this demo I will just type in my default root site collection which is http://sps/.
Lastly, navigate to Central Administration / System Settings / Manage services on server and start the Managed Metadata Web Service.
Create and Configure Accounts and Permissions
Configure the User Profile Service:
Now that we have successfully configured our Managed Metadata service we can now focus our attention on the User Profile Service. The User Profile Service provides our SharePoint farm with all the social networking features that we have come to love in SharePoint 2007, plus more. It forms the basis of My Site support, User profile pages, Audiences and some of the newer features in SharePoint 2010 social computing such as social tagging.
Before we begin, we need to ensure that our Farm account (DOMAIN\sp_farm) is listed as a member of the Local Administrator’s group where the User Profile Synchronization (UPS) service will be deployed. Please make a note to remove the DOMAIN\sp_farm account from the Local Administrator’s group after provisioning the User Profile Synchronization service. Please also note, that if you ever have to re-provision the UPS service at a later date, that you will need to ensure the DOMAIN\sp_farm account is added back to the Local Administrator’s group.
Let’s now navigate to Central Administration / Application Management / Manage Service Applications.
Click New and select “User Profile Service Application”

Now on the ribbon click the New icon and choose the User Profile Service Application.
 |
| New User Profile Application option |
The “Create New User Profile Service Application” window pops up in which you will enter the following details; (you will obviously enter in the details based on your environment setup)
The Create New User Profile Service window will appear. Enter some of the common and obvious fields such Name, database server, database names, etc. I will focus only on those fields where you need to change the default settings.
Name: User Profiles
Create new application pool: SharePoint – User Profiles.
 |
| Create New User Profile Service Application window |

Enter your Profile Database server details and database authentication. You will notice that SharePoint 2010 introduces the ability to configure Failover Server which allows you to associate your SharePoint databases with another SQL server for failover purposes utilising SQL Server database mirroring. We will not specify a Failover Database server for any of our databases at this present time.

Specify your Synchronization Database which is used to store configuration and staging data for synchronization of profile data such as that from Active Directory.

Next, specify your Social Tagging Database which is used to store tags and notes that are created by users. Social Tagging is a new feature in SharePoint 2010 which is not only displayed against the items that user’s are tagging, but are also displayed in the user’s activity feed.

Next, select your Profile Synchronization Instance Server.
In the proceeding section, we will not create a My Site Host URL and will leave this for part two of this series.
Click Create.

You should now have the User Profiles service application listed and started.

We will now venture back into Central Administration / System Settings / Manage services on server.
Scroll down to the User Profile Service and User Profile Synchronisation Service and start both. The User Profile Service should start without any further user interaction, however the User Profile Synchronization Service will ask for your SharePoint Farm credentials.

Click Ok.
Both services should now be listed as started.
This in turn, will correctly configure and start our ForeFront Identity Manager Windows Services (FIM).
Now configure our User Profile Connection to our Active Directory Domain.
Navigate to Central Administration / Application Management / Manage Service Applications.
Click on User Profiles / Manage.

Click on Configure Synchronizations connections / Create New Connection.
Enter the follow details;
Connection Name:
Type: Active Directory
Auto discover domain controller or specify a domain controller
Authentication Provider Type: Windows Authentication
Account Name / Password:
Port: 389

Click on Populate Containers

Click OK.
Your connection should now be listed as follows upon successful creation.

We can now easily setup connection filters against our Active Directory User Profile connection by clicking on the connection that was just created and selecting “Edit Connection Filters”.
Specify and Add any User or Group exclusions and then click OK.

Next we will Configure a Synchronization Timer Job via Central Administration / Application Management / Manage Service Applications / User Profiles.

Click Enable
We will finish off by initiating a full synchronization via Central Administration / Application Management / Manage Service Applications / User Profiles / Start Profile Synchronization.

In order to confirm that the import was a success, the Number of User Profiles should now be set to the number of users in your organization, in my case I have 269 dummy users in my Active Directory domain. Word of note; this will take some time and is considerably slower than an Active Directory User Profile import in SharePoint 2007

You can also venture into Manage User Profiles and search for users (please take note that SharePoint 2010 does not display any users by default and that you will have to search for them).

Edit a User Profile to ensure that all the necessary Active Directory attributes were successfully imported.

We have now successfully completed a User Profile Synchronization which will form as a basis for User’s My Sites in my next article. Until then, happy SharePointing!!
References
User Profile Service administration (SharePoint Server 2010)
http://technet.microsoft.com/en-us/library/ee721050.aspx
Configure profile synchronization (SharePoint Server 2010)
http://technet.microsoft.com/en-us/library/ee721049.aspx
No comments:
Post a Comment